Using Visual Studio Online Build, Squirrel and Azure for continuous integration and deployment of a desktop application.
Introduction
I am working on a WPF desktop application that is controlling a complex instrument. The software gets installed locally on customer’s machines and we would like to simplify the application update process as much as possible.
Fortunately, with the relatively new Squirrel.Windows, it has become easy to create an auto-updating application. Squirrel.Windows, is an installation and update framework, it puts itself in the same vein as “ClickOnce”, meaning a very simple and transparent install process for your application, simply start the setup.exe and it will install and run the app. It has also built-in update capabilities, with the app “calling” a server to see if it has an update and updating itself when needed.
It’s a lot more robust than ClickOnce, you can not only publish a .Net application, but also any kind of application. It’s also a lot simpler to configure and get running. It’s based on Nuget packages, so you can leverage all the NuGet packaging tools and documentation to create your package.
My goal
Basically, I would like to have the build process do the following:
- Get the latest version of the sources from the source control
- Update the assembly version to the current build version
- Build the application
- Sign the application using a code signing certificate
- Package the application into a Nuget package for Squirrel
- Run the Squirrel release creation tool
- Sign the resulting Setup.exe using the same code signing certificate
- Upload the results of the creation tools to an Azure Blob storage accessible to customers
The tools we are going to use:
- Visual Studio Online - It’s a “cloud” version of Team Foundation Server, and Microsoft’s answer to GitHub and the like. It has everything you need to manage, version, build and test your development project. It’s also free for up to 5 developers, even for “closed-source” projects. In that scenario, I’m going to discuss mostly the build capabilities.
- Squirrel.Windows - For installing and updating your application
- PowerShell - For all the scripting needs. VS Online build system allows to run PowerShell scripts during the build process, really useful
- Code signing certificate - Important to remove those annoying messages that the application is not safe during the install
- Azure Blob storage - To publish the application setup. You can probably use something else, like Amazon cloud storage, or any storage where people can then download your application from. Azure is easy because it has “build steps” directly in VS Online build process.
Prerequisites
I won’t dive into the details on how to use the rest of Visual Studio Online, you should already be able to add your code to the source control system of your choice. Personnally, I’m using Git, but this guide should work as well with TFS Source Control.
So, to follow this guide, you should already have the code of your WPF/WinForms app pushed to the Visual Studio Online repository.
Procedure
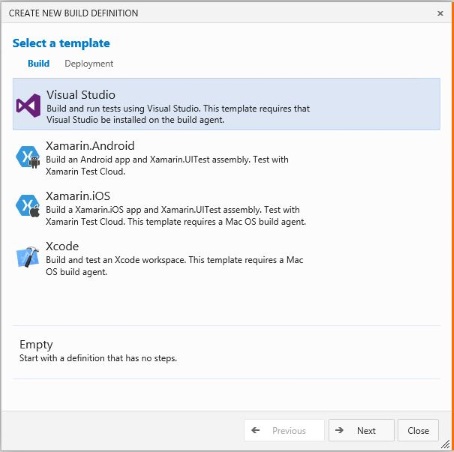
OK, enough talking, let’s dive into the complete process. First, open your project on Visual Studio Online, go to the Build tab and hit the green “+” arrow on the left. This will open the Create new Build Definition
You can either chose to start with a template or start empty. As you can see, it’s not only able to build .Net applications using Visual Studio, but also Xamarin and Xcode. Choose the Visual Studio template and click Next.
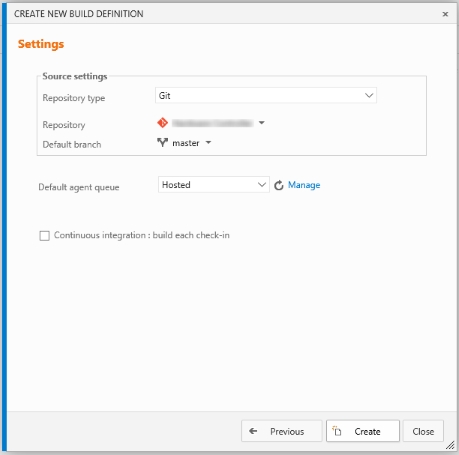
You can then select the settings of on which repository the build runs, and which branch is used to do the build. A check box at the bottom allows to define if you want the build run at each check-in.
Select the correct repository and branch and click on the Create button.
A default build definition with the four following steps pre-defined:
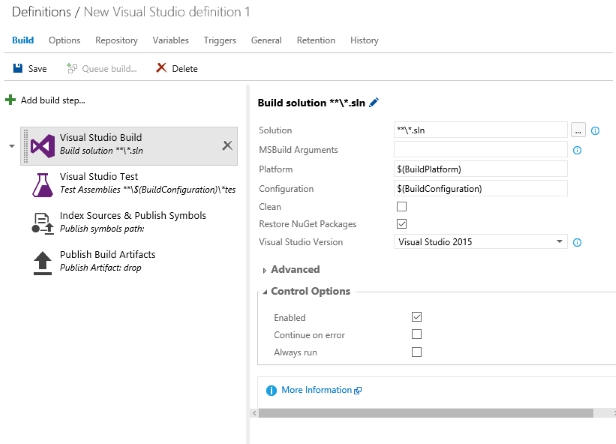
- Visual Studio Build - Relatively self-explanatory, allows you to build your application. It should already be pre-configured and ready to use. It will search for a
.slnfile and start the build process on the contained projects. It also has the ability to Restore Nuget Packages automatically. - Visual Studio Test - By default, this step will search all compiled dlls that contain test and will try to run unit tests on it. The step will fail if Unit tests have failed, making sure you don’t publish things that have non-passing unit tests.
- Index Sources & Publish Symbols - This step is useful if you’re using .pdb files to help you debug your application. It will basically copy all your .pdb files to a symbols folder to retrieve and use for debugging sessions.
- Publish Build Artifacts - This steps allows you to copy binaries and other files created by the build process on a server of file share to download. Very useful for debugging and testing the build project, will copy the files that you have selected and allows to download as a .zip file.
##Get the latest version of the sources from the source control##
At the beginning of the build run, the build engine will automatically pull the latest version of the selected branch and set its current folder to the root of your repository content. This means that ./ in scripts will always be the root of your repository.
Therefore, there is nothing you need to do for this, it’s done automatically for you.
##Update the assembly version to the current build version##
Each build should get a unique identifier for identification. This meaningful name is the build number. By default, the build number uses this format:
$(Date:yyyyMMdd)$(Rev:.r) which will result in something that looks like this: 20090824.2
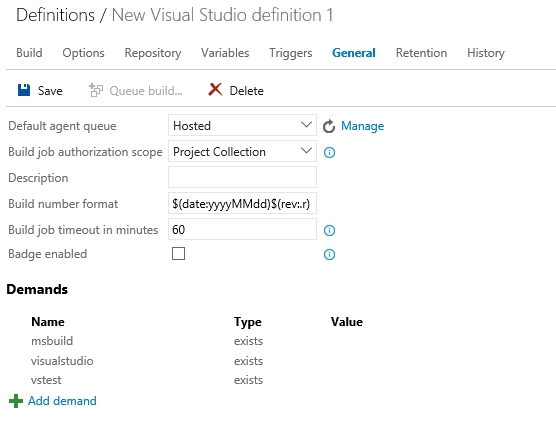
As you can see, it uses flags replaced based on the date, and the amount of builds run. You can get a complete list of the available flags on MSDN. You can edit the build number format by going to the General tab of the build definition:
When using continuous integration, it is very useful to link back the current version of the application to the build. A nice way to do this is to use the build number as the version number for the application. To do this, create a PowerShell script that runs before the build process and that modifies the AssemblyVersion in the AssemblyInfo.cs files contained in your project.
In my solution, I’m using a modified version of a code sample from a MSDN page. I have simplified it greatly because I’m using a trick to have only one SharedAssemblyInfo.cs files that has the AssemblyVersion for all my projects. If you’re interested, you can check the how-to for this trick here.
To use the PowerShell script during your build process, simply commit it to your source control and push the sources to the server. Then, in the Build tab of the definition, click the Add build step… button. Select Utility and click on the Add button for the PowerShell script step. Then, to configure it, select the step, and add the path and filename to your script in the Script filename field.
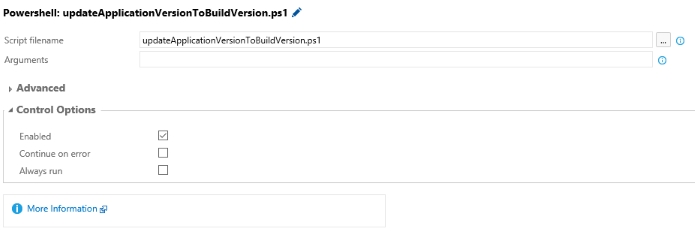
The AssemblyInfo.cs files will now be updated before the build, changing the version of your application with the build number. Save your build, and continue to the next step.
Build the application
Not much to do at this step, you can normally leave the Visual Studio Build step with its default settings and it should correctly build your application.

You can see that, in my case, I have removed the checkbox to Restore NuGet Packages in the Build definition, and have added a NuGet Installer step at the beginning of the build process. The idea here is that it would allow me to run scripts before the build, but after the NuGet restore. For example, it could call a utility that would be installed through a NuGet package.
Sign the application using a code signing certificate
If your application isn’t signed, Windows will display a warning that the application is not safe before running it. It has become even more important since Windows 8, where the warning has become really annoying, forcing the user to click on multiple buttons to tell the OS that yes, he is sure to want to run the application.
You can buy code signing certificates from multiple vendors, it costs around $200 per years. Make sure that when you buy, the certificates are compatible with .Net (they usually are). Depending on the vendor, you’ll probably have different options on the file format for the certificate. What you’ll want is a .pfx file. This will allow you to use it with signtool.
In order to sign your application with signtool during the build process, the easiest is to create a new PowerShell script. It is a simple console application with very few parameters. You can check the documentation, but I’ll explain the simple scenario of signing your just built .exe.
The really annoying part about using signtool in the build process, is that signtool.exe is not part of the path of the build machines. This means that if you simply do a call to signtool /f ... you’ll end up with a file not found error.
Fortunately, it is simply installed at the standard path, in the Windows SDK folder. I have simple created an alias for its path.
You can see that I’m passing arguments to the script, this way you can have your pfx password stored in VS Online instead of being hard-coded in the script.
You then add a new PowerShell build step after the Visual Studio Build step and configure it to call your newly created script as well as passing the arguments.

Package the application into a Nuget package for Squirrel
Now that we have signed our .exe, we can create the NuGet package for Squirrel.Windows. As you can read in Squirrel’s getting started page, Squirrel uses NuGet packages to define what he needs to copy to the machine during the installation.
The important points are the following:
- All the files must be under a lib/net45 folder
- There must be no dependency
- The package ID should be the “App name” and should not contain spaces.
- You have to have the
squirrel.dllin the package. - There is a set of conventions that defines the name of shortcuts, product version, icon, app folder, etc.
VS Online’s build system has a Nuget Packager build step, this is what we’re going to use to create the package for Squirrel. Add it after the sign application step.
As you will see, it uses nuspec file to define what will be in the package. Head back to your solution, and create a .nuspec file.
I think it’s relatively self-explanatory, I’m getting all .exe, .dll and .config files that the build process copies into the /bin/Release folder and pack them in a /lib/net45 target in the NuGet package. As you can see, I also have an “Utils” folder that I’m also copying to the folder. After the install, it goes to the installation folder, like the dlls and exe.
Using the tag $version$ in the <version> tag allows the use of the Use Build number to version package checkbox on the NuGet Packager build step. This way, the NuGet package version will match your build version. You also have to select a folder in which the package will be created.

Run the Squirrel release creation tool and sign the resulting .exe
To create the Squirrel setup files from the NuGet package, you have to run a little tool, called Squirrel that has a --releasify command that will tell him to create a release from the setup. You can check the (a little too concise) help about this tool in Squirrel’s documentation.
If you have installed Squirrel in your project using NuGet, it will be in the .\packages\squirrel.windows.1.x.x\tools folder.
You call it this way:
Squirrel --releasify NuGetPackageFolder\nugetPackageName.2015.11.13.0.nupkg --releaseDir .\Release
The way it works is that if the Release folder doesn’t exist, he will create the first version of the application. He will copy the .nupkg and add a -full suffix at its name. He will also copy a Setup.exe in the release folder and create a RELEASE file that will contain a list of releases of the application, with the name of the NuGet package and a unique identifier for each.
If the folder exists and has releases already, he will compare the latest release contained in the folder with the NuGet package that we passed to the command. He will then create two files, one with the suffix -delta that will contain only the difference between the earlier version and the current (for updates), and one with the suffix -full containing the full version (for new installs).
Copy release from Azure Blob storage
As you understand, to have the “releasification” work correctly, Squirrel needs to have access to the Release folder containing all the existing releases. The issue is that, with Visual Studio Online’s build process, the build folder seems to always destroy all directories created during the build, and I couldn’t find any solution to tell him to keep some specific folder.
The workaround I found for this issue was to simply copy back the folder from Azure to the build machine before the call to releasify. Again, I’m using a PowerShell script that does it this way.
Again, nothing very complicated in this script, I’m creating a storage context by passing him the account name and key, list the blobs contained in a container and download them to the Release folder.
If you’re lost on what an Azure storage, Container and blob is, don’t worry, I’ll explain later when we’ll talk about publishing the application to Azure.
Copying back the files from Azure feels a bit “dirty”, but is relatively quick. There is maybe a better solution, but I haven’t found it yet. Feel free to send me a comment if you have a better/more clever idea.
Call releasify
Now that we have copied the Release folder back into the machine, we can call releasify. The script is quite self-explanatory. The only trick I’m doing is that I’m “guessing” the name of the NuGet package from the build number, and signing the Setup.exe after it is created with my code certificate.
An important trick here is the piping of the call of releasify to Write-Output. This is because Squirrel.exe is not marked as a console application, so PowerShell will call it and continue without waiting for it to finish. You’ll end up with really weird results, like have created files and things like that. Adding the pipe to Write-Output makes sure that PowerShell waits for the app to finish before continuing (and he will output the results if there are some).
Upload the results of the creation tools to an Azure Blob storage
Now that we have our Release folder created (and updated) by Squirrel, we can upload it to Azure. I’m using Azure Blob Storage for this.
If you don’t have an Azure account yet, create one and make sure that you have activated a pricing scheme.
Add an Azure File Copy build step to your build definition and click on the Manage button in the step to link your Visual Studio Online to the Azure subscription. It’s really straightforward, just click on New Service Endpoint, select Azure and follow the instructions.
Back to the Build specification, you should now be able to select the subscription in the drop down list.
Select the source to the ./Release folder created by Squirrel.
Next, the Storage Account. You will need to create one in Azure’s interface. Follow the instructions on this MSDN website if you are lost, but it’s really simple. Once you have created the Storage Account, you’ll be able to get the Name and Key to use in the script to copy back the release folder. Add the name of the newly created Storage account into the Azure File Copy step.
Set destination as Azure Blob and the container name to anything you want. You don’t have to create it as it will be automatically created by the step.
Here’s the final look at the build definition
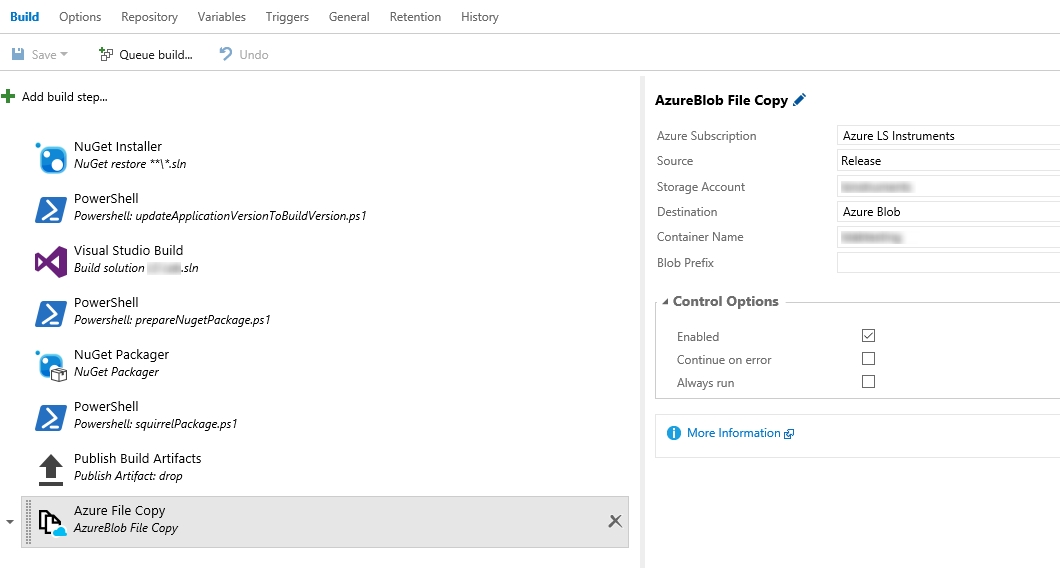
Run your build, and your application is ready to install using Squirrel, give your users the link to the setup.exe in your blob storage, and it will install the application.
Conclusion
Even though the process is relatively complex, it is easy to understand once you have the hold of it.
